
T-H-I-N-X resources
Abstract IoT resources and server model
For IoT I have created an abstract resources model. You find the details in this document. It is work-in-progress and will be updated over time.
The main purpose of this document is to give a conceptual umbrella to the IoT stuff. If you are mainly interested in concrete hacking or how-to hints, this document is obsolete to you. If you want to
have a surrounding thinking model around your IoT architecture, if you want to see how IoT maps to best practices in Software Engineering and if you want to learn, how this fits into the "loose
coupling" concepts of software API's and upcoming IoT ecosystems, this is the place where you will find answers.
This document also contains details about mapping the abstract IoT model to JSON and a HTTP REST API plus a Swagger 2.0 spec for the proposed API.
If you have feedback, please use the mail address contained on the first page of the document.
WebIOPi resources
Document "WebIOPi Device Driver Guide"
One of the most valuable assets of WebIOPi is its rich set of device drivers combined with the possibility to further add more drivers. For well skilled (Python and JScript) software developers it's
quite feasible to add drivers with limited time effort, however, some info is needed to speed up this process by documenting and explaining the driver abstraction framework provided by WebIOPi.
This document provides a guideline what things have to be considered when developing device drivers for WebIOPi. Keep in mind, this document is not meant for plain "end" users of WebIOPi as it does
not explain anything about project setup for applications. For those, please look at the Wiki pages provided by Eric. However, if anyone wants to have a look what's behind the curtain of WebIOPi
device driver management, this document may also provide some intrinsic details.
WebIOPi testing console (Swagger-based) [This content is outdated, a new version based on Swagger 2.0 will be soon available]
Testing is important and it's quite easy to test the WebOIPi HTTP REST calls with a browser, you just can type-in the URL and see the result. However, this applies only to HTTP GET calls. To test
POST (or any other) calls, you have to use some kind of console tool like curl or HTTP helper tools that e.g. come as a browser extension that allow you to specify the HTTP verb to be used (fyi, I
use the Firefox Plugin HttpRequester).
Some other things can be tested using the WebIOPI device monitor, but it does just expose generic information and modifying actions about devices. It does a great job for what it stands for (device
monitor), but also can't serve as universal testing tool.
For more detailed testing it is also possible to build customized HTML pages that expose the desired REST calls complete, but just for testing this may be a bit too complicated extra work to do.
Plus, according to the very frequent HTML/JScript "help-wanted" posts in the WebIOPi forum, JScript coding looks not to be very easy for many users.
So, I was on the search for some kind of tool that allows basic testing based on a formal specification of the REST APIs. One possibility I found was the ApiGee console-to-go (see "Links" tab for
info about that) and it works quite well. I have created and used an ApiGee-augmented WADL-spec for WebIOPi. But, as the (free) ApiGee console-to-go is a cloud hosted service this kind of testing
does only work if your WebIOPi server is exposed to the public internet. To make a long story short, I really dislike exposing my WebIOPi server(s) public to the internet for security reasons, even
if this is just done temporary for testing.
So I abandoned this approach and looked further. Then I came across the open source tool Swagger. I tried it and it worked very satisfying to my
needs. Below is a screenshot of it.
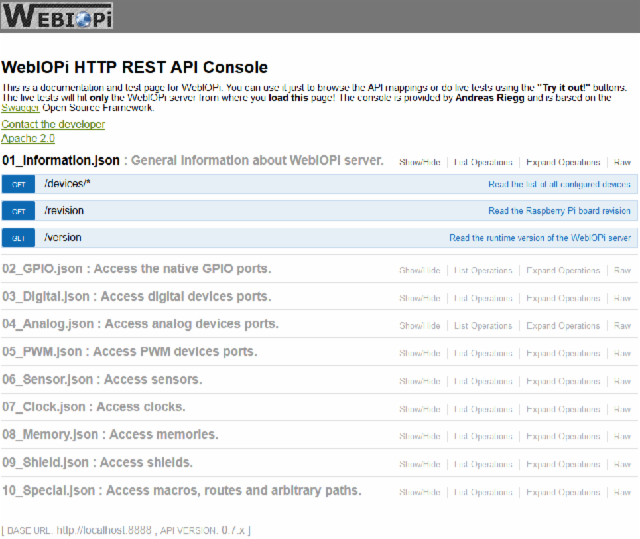
As it is not a hosted solution but available as JScript source I was able to modify the original version a bit (just a few lines of JScript patches) in a way so that it can be hosted fully
self-contained and local on a WebIOPi server without needing external internet requests and HTTP CORS support.
For usage of this console, just download this ZIP-file (please obey to the tips I provide on the "Home" tab concerning "Content") and transfer it via e.g. FTP to your WebIPi server(s). The archive
contains on its root an index.html that replaces the original index.html of WebIOPi. It just adds another link to the testing console below the device monitor. The archive
also contains a subdirectory called "api". This subdirectory has to be copied as-is with all its subdirectories to the same level as the /app subdirectory of WebIOPi which is in most
cases just the htdocs folder of WebIOPi when you untar it during the installation process. If you do it right, you have an /app and /api directory in
parallel.
Hint 1: You do not need any other installation action than just copying the files. But you have to make sure the right htdocs folder is modified and used. You can do this either
by specifying the correct doc-root path within the config-file (and making sure, this config-file is the one that is really used ...) or by modifying the original htdocs folder that
gets created during installation and calling "sudo ./setup.sh skip-apt" again which copies the content of the installation htdocs folder to /usr/share/webiopi which is
used by default by WebIOPi.
Hint 2: If you want to test routes, arbitrary pathes or use for any other reason special characters like "/" manually entered into the request parameter entry fields, you have to apply the
percent-encoding patch of WebIOPi issue 100. Otherwise your request will not be handled correct and you will get a 404 error. Applying this patch means replacing the file
python/webiopi/protocols/http.py with the one from the patch and calling "sudo ./setup.sh skip-apt". If you combine hint 1 and hint 2 it's sufficient to call setup.sh just
once at the end.
Have fun with the console and give feedback if you like to provide me. As the Swagger toolset gets updated from time to time I will provide an updated version of the console over time if the changes
are important.
Some helpful hacks and tips
Linux blinking light "monitor" and button shutdown script
Running headless Linux servers is fun, but sometimes you are physically standing in front of them and you want to see instantly, if the wall-mounted beast is still running. And sometimes you want to
initiate a secure shutdown without starting a remote ssh connection (especially when the network connection is broken ...) by just pressing a button. This shell script helps to implement that.
You find the documentation how to run the script automatically at bootup as comments inside. The used GPIO pins are just examples for what I used, you can change the numbers to whatever you want.
#!/bin/sh
# Must be run as root "sudo server.sh"
# GPIO numbers should be from this list (rev 2 board)
# 4, 7, 8, 9, 10, 11, 17, 18, 27, 22, 23, 24, 25
# GPIO numbers should be from this list (rev 1 board)
# 4, 7, 8, 9, 10, 11, 17, 18, 21, 22, 23, 24, 25
# Note that the GPIO numbers that you program here refer to the pins
# of the BCM2835 and *not* the numbers on the pin header.
# So, if you want to activate GPIO7 on the header you should be
# using GPIO4 in this script. Likewise if you want to activate GPIO0
# on the header you should be using GPIO17 here.
# Howto
# Export GPIOs to use it
# echo "21" > /sys/class/gpio/export
# echo "25" > /sys/class/gpio/export
# Set direction
# echo "in" > /sys/class/gpio/gpio21/direction
# echo "out" > /sys/class/gpio/gpio25/direction
# Read from input
# cat /sys/class/gpio/gpio21/value
# Write to output
# echo "1" > /sys/class/gpio/gpio25/value
# echo "0" > /sys/class/gpio/gpio25/value
# This script is used to have a LED blinking and have a button to shutdown Linux
# This way the Raspi can be monitored and controlled a basically when used as headless server device
# Export GPIO 25 and set to output
# LED Linux OK
echo "25" > /sys/class/gpio/export
echo "out" > /sys/class/gpio/gpio25/direction
# This is for rev2.
# Set up GPIO 21 and set to input
# This is for hardware shutdown button
echo "27" > /sys/class/gpio/export
echo "in" > /sys/class/gpio/gpio27/direction
shutdownflag="0"
# while [ "$shutdownflag" = "0" ] do Stringvergleich
# while [ "$shutdownflag" -eq 0 ] do Zahlenvergleich
# Blink LED and loop until button is pressed for ca. 2 seconds
while [ "$shutdownflag" = "0" ]
do
sudo echo "1" > /sys/class/gpio/gpio25/value
sleep 0.1
sudo echo "0" > /sys/class/gpio/gpio25/value
sleep 0.1
sudo echo "1" > /sys/class/gpio/gpio25/value
sleep 0.1
sudo echo "0" > /sys/class/gpio/gpio25/value
sleep 2
shutdownflag=$(sudo cat /sys/class/gpio/gpio27/value)
done
# Indicate acceptance of shutdown command by blinking LED 20 times quickly
i=1
n=20
while [ "$i" -lt "$n" ]
do
sudo echo "1" > /sys/class/gpio/gpio25/value
sleep 0.05
sudo echo "0" > /sys/class/gpio/gpio25/value
sleep 0.05
i=$(($i+1))
done
# Set LED on to see executed shutdown when going off finally by Linux
sudo echo "1" > /sys/class/gpio/gpio25/value
# Clean up GPIOs before shutdown
echo "25" > /sys/class/gpio/unexport
echo "27" > /sys/class/gpio/unexport
# Do shutdown
echo "Initiate shutdown"
sudo shutdown -h now
echo "Ready"
# Explanation to add this to the Linux start script
# sudo nano /etc/rc.local
# Add the path to the script file:
# /home/path..../server.sh &
# The & means that the script will be running in background
The script in the above form works as-is for the Raspberry Pi (rev1/2, revA/B) and Raspbian and the LED and push-button connected to one of the native GPIO ports. The push-button can be tied with a pullup to 3v3. It should connect to GND when pressed. Bouncing should not be a problem as the state is just asked once. For stability reasons I recommend to drive the signaling LED via a FET from 5v and having the gate connected via a 10k resistor to GND.